GitHub actions and Azure without secrets


It is possible to have pipelines authenticating without secrets, I described in general in [../pipelines-without-secrets]. Now let’s have a look on how we actually do this. Here are the necessary steps to have a GitHub workflow deploying to Azure resources without any secrets.

We will need:

  • An Entra Application configured with Federated Identity for GitHub
  • GitHub workflow with necessary steps to authenticate to Azure

It is worth a consideration if you can just use one app for everything, and hereby using the same privileges as they are assigned to the app. Eg. to have different privileges for production with different subscriptions, clusters, etc. it might be worth creating multiple apps and configure accordingly.

In the following there will just be one app, but you can of course just do it several times with different app names, ids, environment names, etc.

GitHub token subject

When integrating with Azure Federated Identity, the allowed subjects are listed. Subject is embedded in the JWT from GitHub with the following rule1:

  • For any deployments to environments (defined in the GitHub workflows), the subject will be repo:<Organization/epository>:environment:<Name>
  • For jobs without an environment the Subject will be based on the branch: repo:<Organization/Repository>:ref:<ref path>
  • For Pull Request the subject will be: repo:<Organization/Repository>:pull_request

I tend to stay with the environment approach, so for building feature branches, a pseudo environment eg. “aks-build” can be used to allow all branches to authenticate with Azure.

If considering multiple applications with different privileges, this is also the place where you can ensure that only deployments to production can have access to the production resources etc.

It is also worth noting, that to be able to access this JWT, we need to provide that as a permission in the GitHub workflow specification (the yaml file):

1
2
3
4
permissions:
  id-token: write # This is required for requesting the JWT
  contents: read  # This is required for actions/checkout
  actions: read   # This is required by the https://github.com/Azure/k8s-deploy action (so skip it unless you need it)

Create Entra Application

I will here use Powershell and Azure CLI to create the Entra Application, I find it is the easiest way to reuse it, but this can all be done through the portal also. It only have to be done once.

For using the Azure CLI you need to be authenticated prior by running az login

I highly recommend to ensure the context is set properly, especially when using multiple clients and tenants. One way is by specifying the exact subscription by running az account set --subscription $subscriptionId

 1
 2
 3
 4
 5
 6
 7
 8
 9
10
11
12
13
14
15
16
17
$appName = "DK.Clients.${client}.GitHubRunner"
$app = $(az ad app list --display-name $appName -o json) | ConvertFrom-Json | Select-Object -First 1
if ($Null -eq $app) {
    Write-Host "Creating Azure App ${appName}"
    $app = $(az ad app create --display-name $appName -o json) | ConvertFrom-Json
}

$appId = $app.appId
$sp = $(az ad sp list --display-name $appName -o json) | ConvertFrom-Json | Select-Object -First 1
if ($Null -eq $sp) {
    $sp = $(az ad sp create --id $appId -o json) | ConvertFrom-Json
}
$assigneeObjectId = $sp.id
$tenantId = $sp.appOwnerOrganizationId

Write-Host " AZURE_CLIENT_ID:       $appId"
Write-Host " AZURE_TENANT_ID:       $tenantId"

The client id and tenant id is needed for the actual authentication and those are not secrets as such.

Next step is to create the Federated Identity for the branches/environments that should authenticate. I will define those as powershell variables:

1
2
3
$organization = "jballe"
$repo = "${organization}/website"
$environments = @("aks-build", "aks-test", "aks-prod")

And then create the federated identity (if it is missing):

 1
 2
 3
 4
 5
 6
 7
 8
 9
10
11
12
13
14
15
16
17
18
19
20
21
22
23
24
25
26
$federatedApps = $(az ad app federated-credential list --id $appId -o json) | ConvertFrom-json | Select-Object -ExpandProperty name

foreach ($environment in $environments) {

    $federatedName = $repo -split "/" | select-object -skip 1
    $federatedAppName = "github-${federatedName}-${environment}"

    if ($federatedApps -contains $federatedAppName) {
        Write-Host "Federated credentials for ${environment} already created (${federatedAppName})"
    } else {
    
        Write-Host "Create Federated Credentials for ${environment}"

        Set-Content -Path "credential.json" -Value (@{
                name        = $federatedAppName
                issuer      = "https://token.actions.githubusercontent.com"
                subject     = "repo:${repo}:environment:${environment}"
                description = "GitHub Actions ${federatedName} (${environment})"
                audiences   = @(
                    "api://AzureADTokenExchange"
                )
            } | ConvertTo-Json)
        $fedApp = $(az ad app federated-credential create --id $appId --parameters credential.json -o json) | ConvertFrom-Json
        $fedApp | Out-Null
    }
}

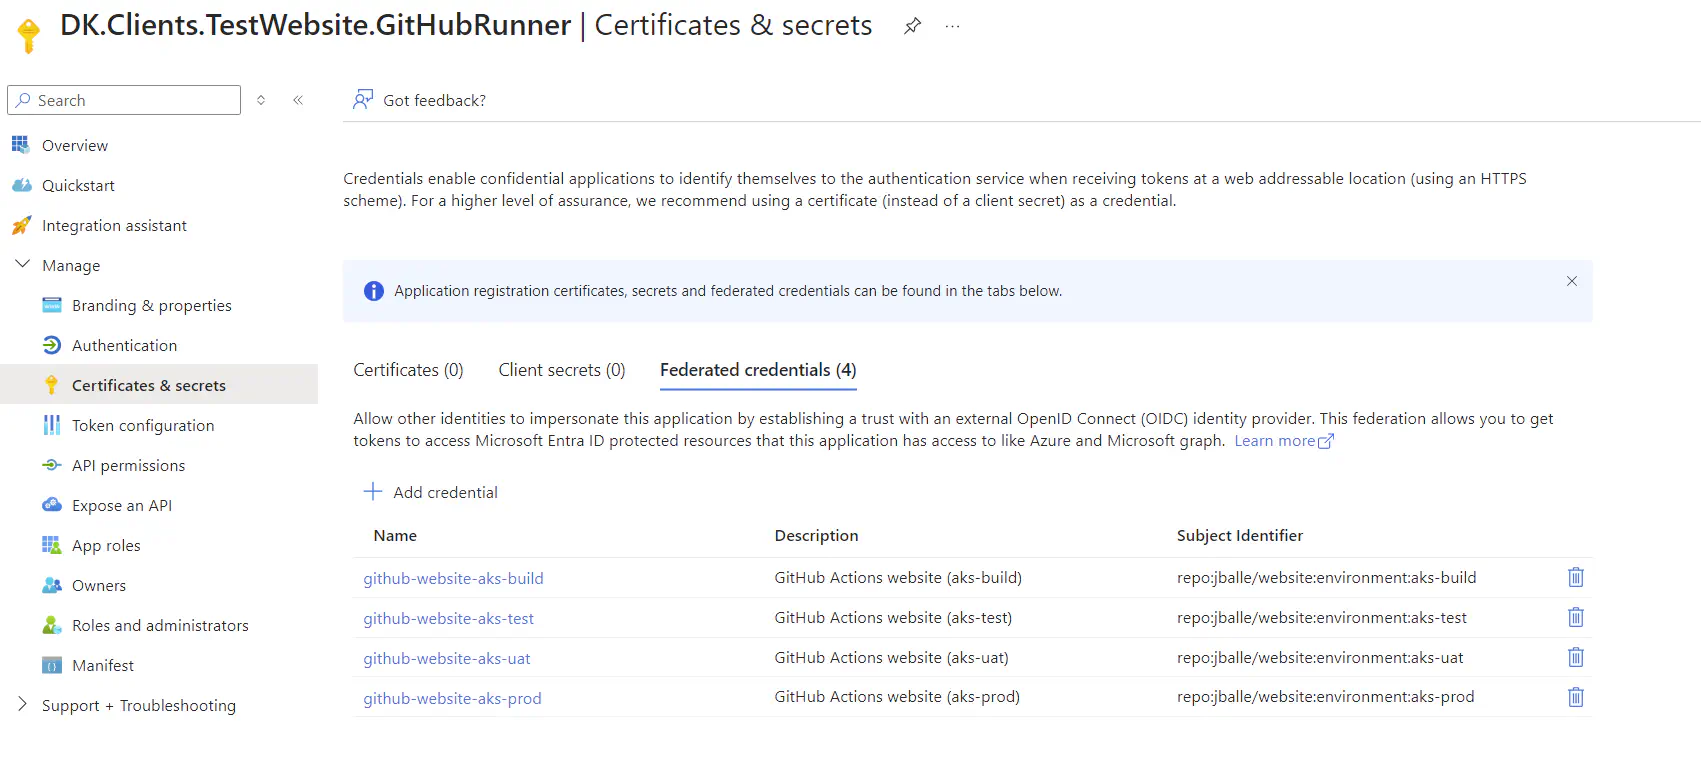
Now you should be able to find the app in Azure Portal within App registrations:

App registration in Azure Portal with Federated credentials

Assign required permissions

For the actual permissions, the service principal is assigned to the relevant resources. Example here is assigned Contributor role to a docker registry and AKS cluster, both identified by their object ids. ($assigneeObjectId is the id of the service principal, so I am reusing the variable from when it was created)

1
2
3
4
5
6
7
8
$resources = @(
    "/subscriptions/$subscription/resourceGroups/$registryGroupName",
    "/subscriptions/$subscription/resourceGroups/$clusterTestGroupName"
    )
foreach($r in $resources) {
    $assigned = $(az role assignment create --role contributor --subscription $subscription --assignee-object-id  $assigneeObjectId --assignee-principal-type ServicePrincipal --scope $r)
    write-Host ("Assigned to {0}" -f (($assigned | ConvertFrom-Json).scope))
}

Necessary pipeline variables

As promised, we don’t need any secrets in the GitHub workflow.However, we still need some identifiers. Here I will create the ids with the Github CLI gh and the variables from above:

1
2
3
4
5
foreach ($environment in $environments) {
  gh variable set AZURE_CLIENT_ID --body $appId --repo $repo --env $environment
  gh variable set AZURE_TENANT_ID --body $tenantId --repo $repo --env $environment
  gh variable set AZURE_SUBSCRIPTION_ID --body $subscription --repo $repo --env $environment
}

If you just have a single app, it can just be repository variables instead of being environment specific. Similar when using the branch and pull requests subjects, you would not use environment scoped variables.

The actual workflow steps

Now it is just a matter of using the variables and authenticate with the actions from Azure:

 1
 2
 3
 4
 5
 6
 7
 8
 9
10
11
12
13
14
15
16
17
18
19
20
21
22
23
24
25
26
27
28
29
30
31
32
33
34
35
jobs:
  deploy:
    name: Deploy
    environment:
      name: aks-prod
    steps:
      # The actual authentication with the above mentioned variables
      - name: OIDC Login to Azure Public Cloud
        uses: azure/login@v1
        with:
          client-id: ${{ vars.AZURE_CLIENT_ID }}
          tenant-id: ${{ vars.AZURE_TENANT_ID }}
          subscription-id: ${{ vars.AZURE_SUBSCRIPTION_ID }} 

      # Login to container registry using normal Azure CLI
      - name: Login to container registry
        shell: pwsh
        run: az acr login -n ${env:REGISTRY}
        env:
          REGISTRY: ${{ vars.REGISTRY }}

      # If using AKS you can use that also
      - name: Setup kubectl
        id: install-kubectl
        uses: azure/setup-kubectl@v3

      - name: Set AKS context
        id: set-context
        uses: azure/aks-set-context@v3
        with:
          resource-group: '${{ vars.CLUSTER_RESOURCE_GROUP }}' 
          cluster-name: '${{ vars.CLUSTER_NAME }}'

      - name: Create namespace if missing
        run: kubectl create namespace ${{ vars.CLUSTER_NAMESPACE }} --dry-run=client -o yaml | kubectl apply -f -

And that’s it. Hope it will help you (at least it will help me with remembering the steps.)